Are you curious about what to expect in a live direct session using Source Connect? If you’ve booked your first job that will be recorded remotely using Source Connect in a live-directed session, CONGRATULATIONS!
SO EXCITING! Take a moment to congratulate yourself for all your hard work. Booking your first big live-directed job is HUGE.
During my last live-directed recording session I took down notes of things I thought would be helpful to share, so you can be better prepared when it’s your time to step up to the mic!

1. Before Your Live Direct Session using Source Connect
Download Source Connect
If you are recording remotely for your live direct session, you will most likely be working with Source Connect. Source Connect is remote recording software. It is the industry-standard software used for allowing another studio to record the audio coming through your microphone.
You may get away with using Source Connect Now. This is the free version of Source Connect. The studio that is recording you would send you a link that you use to connect when the session starts. This is very similar to using Zoom. You just set your input and output settings to your audio interface.
However, you will most likely be required to use Source Connect Standard.
You can purchase Source Connect Standard outright for $650 here.
You can also purchase a monthly subscription for $35, with a $75 setup fee, here.
Or you can purchase a 2-day pass for $25 here. Although this option does not include customer support.
Scripts
Take time before your session to ensure that you have all the scripts you need for the session. Make sure you check your email right before your session in case last-minute script changes have been made. Make sure they are accessible to you at the microphone and are formatted in a way that will maximize your performance.
I use Google Docs. I format my scripts so they are in size 16 font and double-spaced. The scripts sync to an iPad in my vocal booth. I love going paperless!
Create a Silent Recording Environment for your Live Direct Session
Make sure all the things that make noise around you are silenced.
- Put your phone on silent.
- Mute your computer so you don’t get notifications.
- Cover up your windows with curtains, or studio blankets.
- Turn off the AC or heat if possible.
- Remove noisy external hard drives.
- Close all the windows and doors.
- Put a notice on your front door that delivery people should NOT knock or ring the doorbell.
- Bring your dogs to a friend’s or family member’s home.
Do whatever you can in order to create a silent environment for your recording session.
Warm Up Your Voice
If your session is at 9 am, make sure you wake up extra early. Take note of how long it takes you to get warmed up and give yourself enough time to sound like you. For me – I get phlegmy in the morning. Also, make sure to do a little bit of a vocal warm-up in the morning. Start with breathing exercises and a light vocal warmup.
Make sure you eat and drink the right things. Avoid caffeine and drink a LOT of water. Also, make sure you eat at least an hour before your session. Keep it healthy. Apples and bread with peanut butter are great for avoiding burps. Stay away from deep-fried foods or food that is too salty or sweet.
2. Change Your Settings in Source Connect & Test Your Connection
The first thing you need to do after you download Source Connect is set up your input/output settings. To do this go to “audio options”, then “Input”. Here you should see your audio interface. Select the input that you have your microphone connected to (input 1 or input 2). Do the same for output.
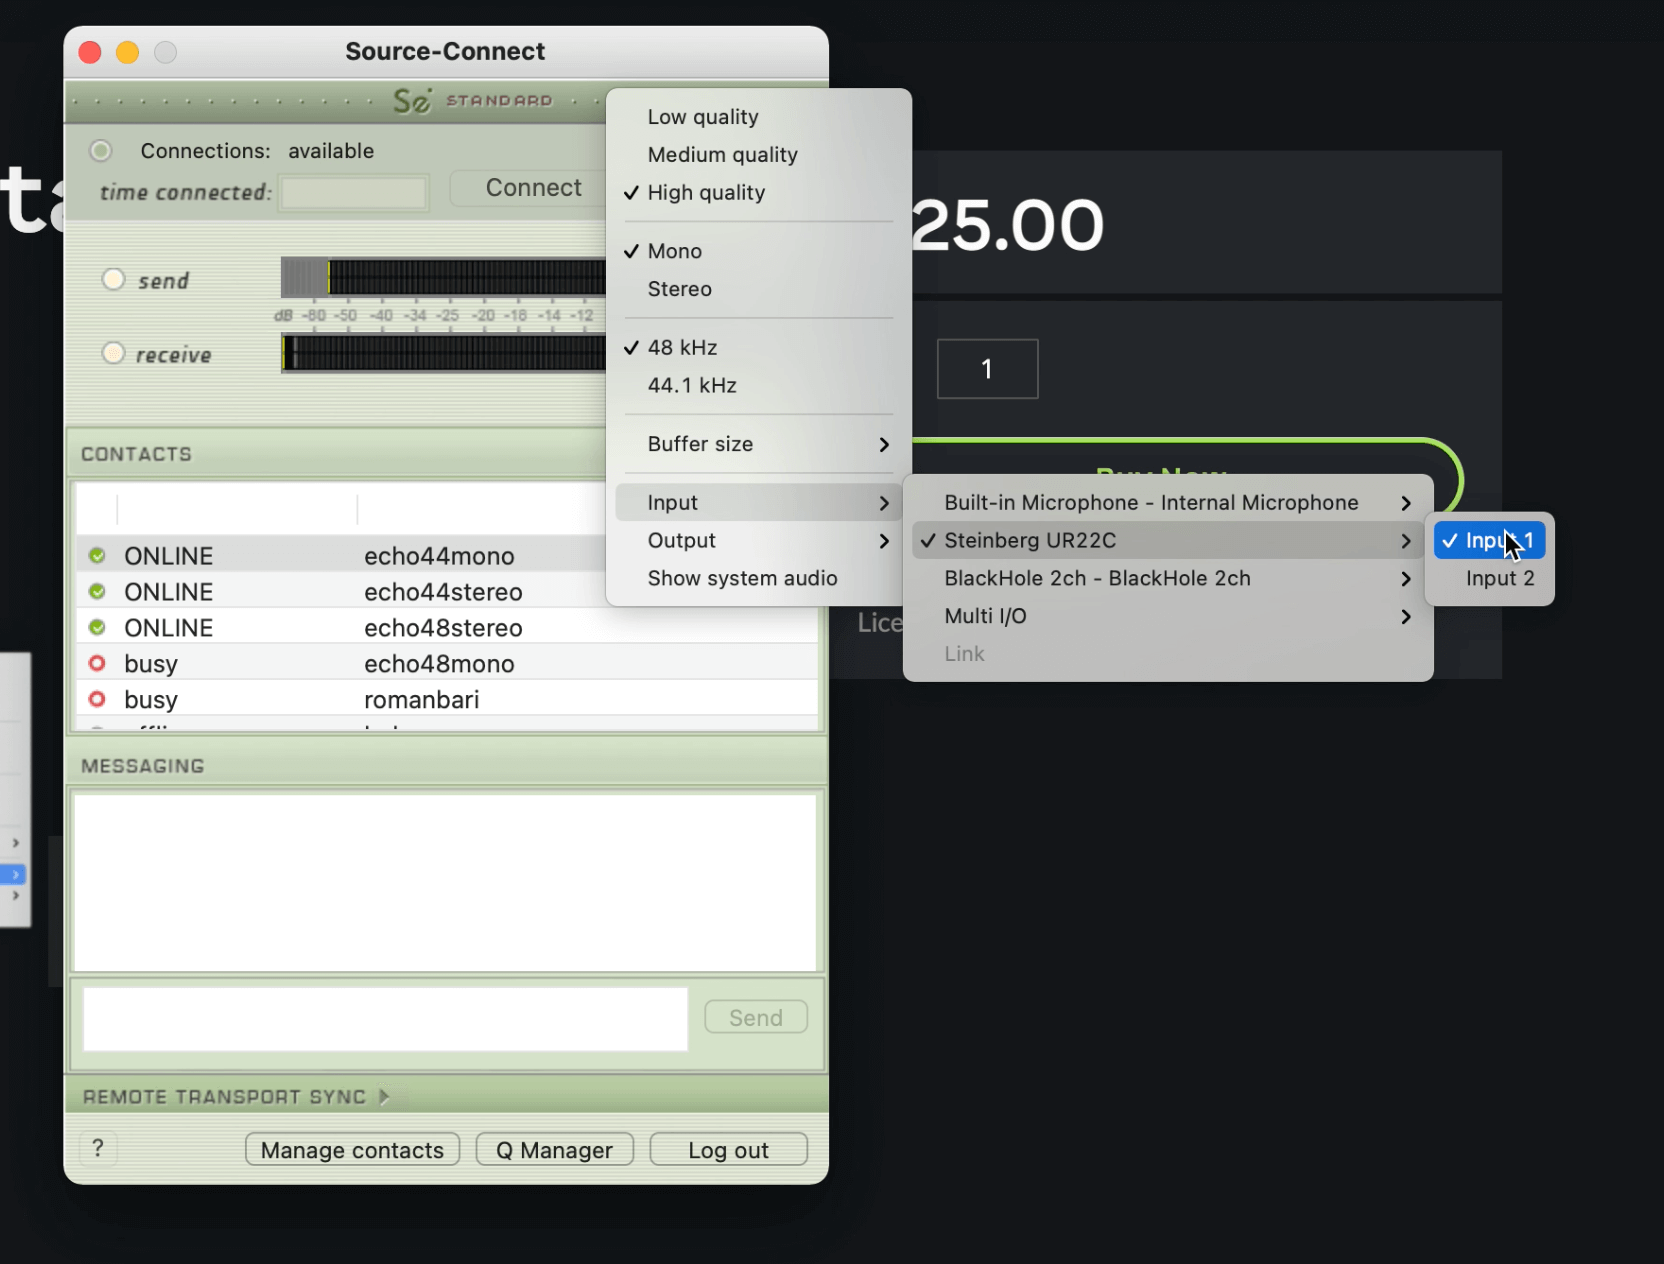
Change your input and outputs to your interface. I use a Steinberg UR22C as you can see here.
Then, select “high quality”, “mono”, “48 kHz”, and “buffer size: low”.
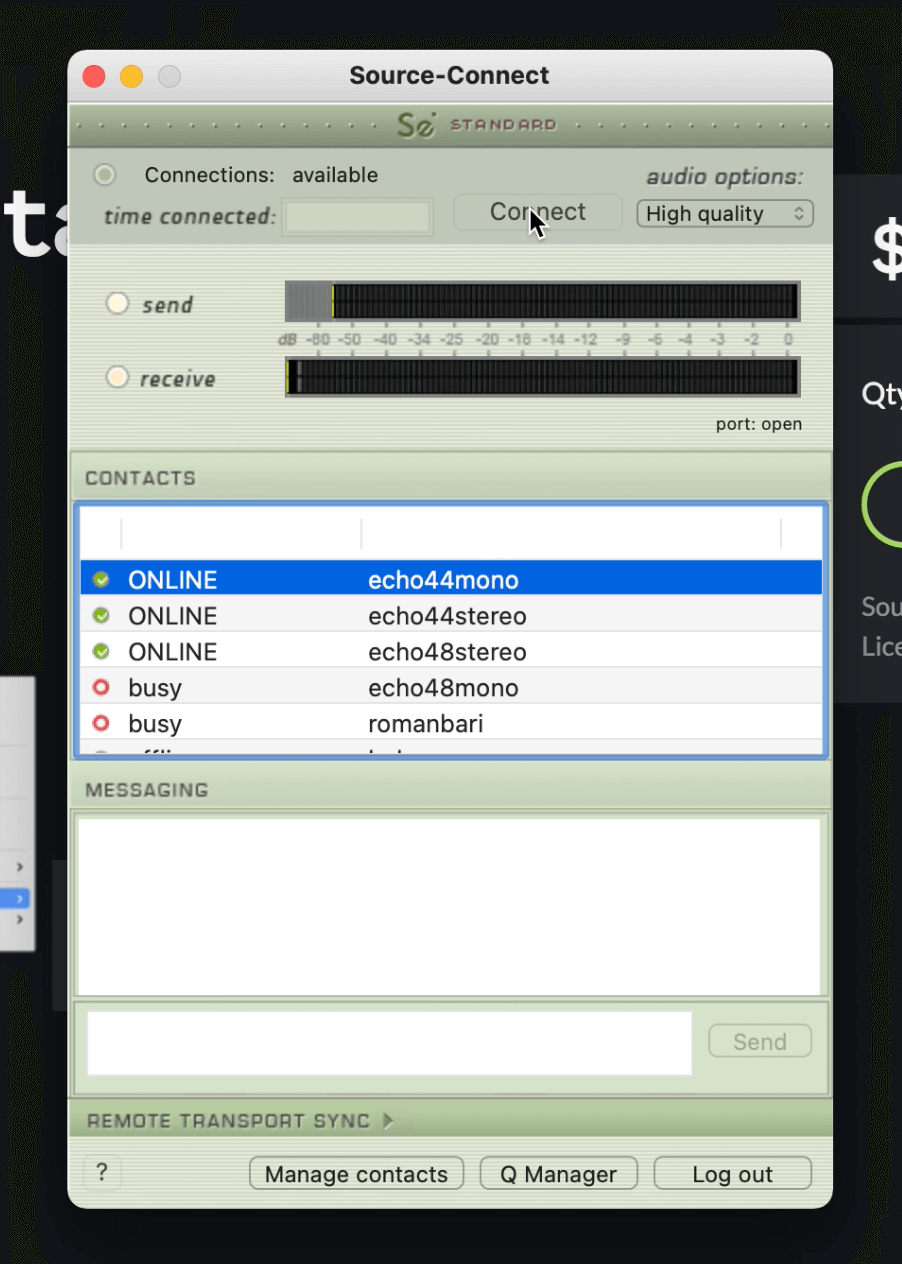
Now you can test that you are connected to Source Connect by selecting one of the “echo” channels. Highlight the echo channel’s name, “echo44mono” for example. And click “connect”. Once you are connected to an echo channel, speak into the microphone. You should hear yourself back in your headphones. This confirms you can both send and receive a signal.
There is also port mapping that should be set up. But this is very technical and I don’t have the capacity to explain it at this current time… lol… You can still do your session without it from what I understand, but it is best if you configure the port mapping. You can reach out to Source Connect support for help.
3. Answering The Connection Request
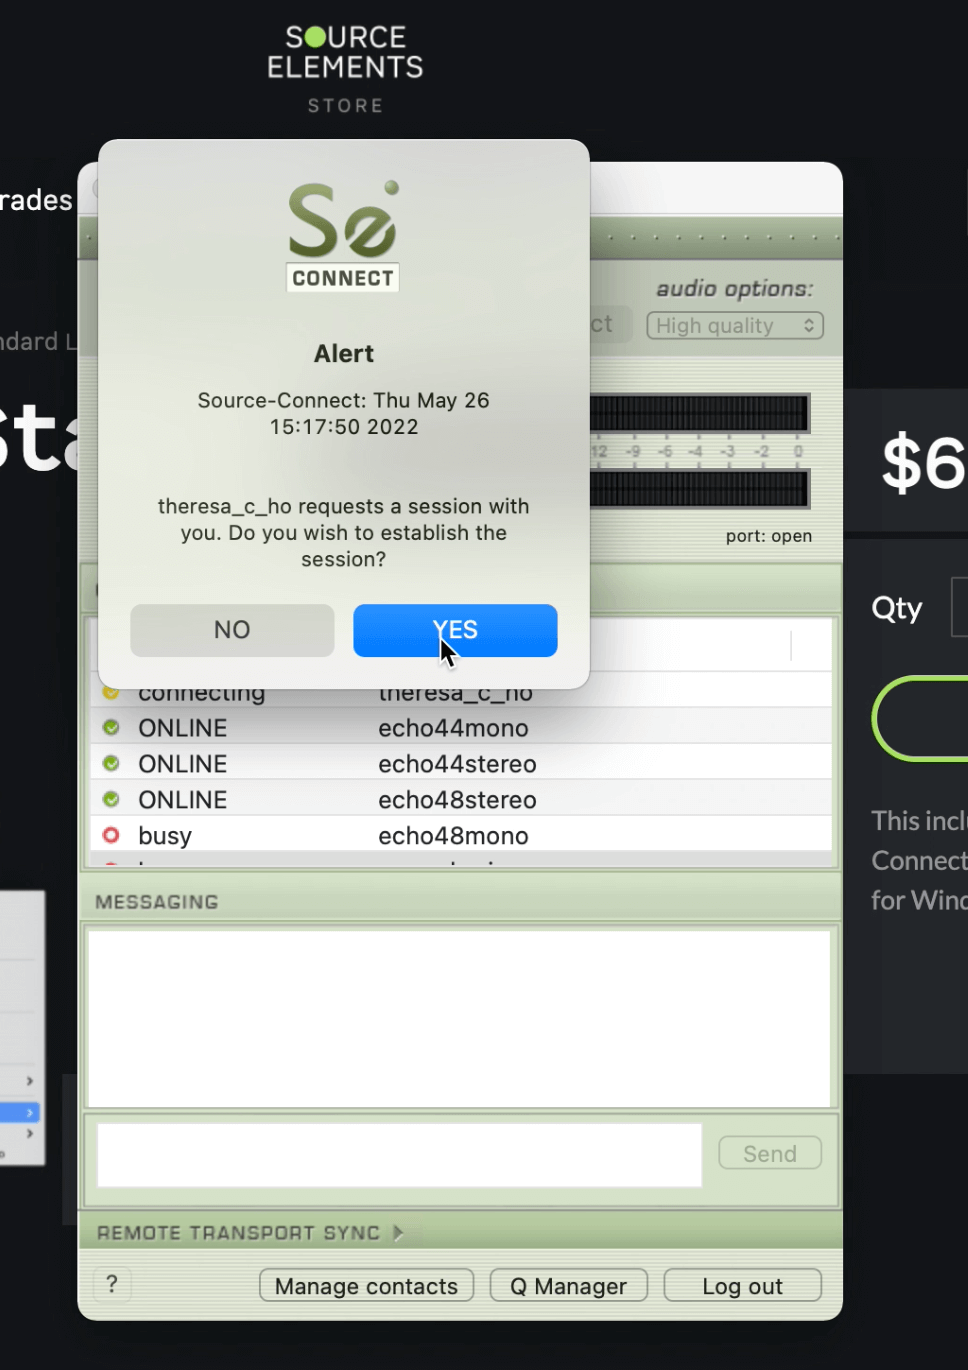
Once you complete the setup and echo test, you are ready to accept the connection request from the studio.
When you are connected via Source Connect, you will receive a “connect request” as a pop-up on your screen. Answer it and you will connect with the studio. Super easy!
4. Introduction
When you have a live-direct session, you are going to meet the engineer and voice director. Sometimes they are the same person, sometimes two different people occupy these jobs.
Their job is to make you feel comfortable, so take this time to introduce yourself, and make sure you know their name. I usually get their name ahead of time, and the first thing I say is “is this so and so?”
Some small talk goes a long way in making you feel comfortable.
They will most likely connect with the agency reps and/or clients during the session. You may be able to hear them discussing their thoughts. They may also give you direction. Or the studio may have the client muted and you will only take direction from the voice director.
5. Recording
By far the most nerve-racking part of this experience will be the few minutes before your session, and the first few minutes of your recording session. The first few takes are the hardest because you are still shaking off nerves. This is totally normal!
We tend to speak faster and higher-pitched when we are nervous, so try to take deep breaths to keep your pitch normal, and be conscious to speak at your normal pace.
Usually, you will record a few takes at the start. Much of what you are doing in a live-directed session is waiting around while the engineers and decision-makers listen back. You will often record, and wait. You have to be ready to give them 100% effort in your next line, and jump in whenever they ask you to perform again.
At this time, your nerves are totally chilled out! Your nerves couldn’t possibly last the whole duration of the session, so after the first couple of takes, you should be kicking butt and not be nervous!
After you have done a few live-directed remote recording sessions, you won’t even be nervous!
6. Receiving Direction During a Live-Direct Session Using Source Connect
Your voice director is a huge asset. It is a really collaborative experience. They will give you notes on your performance. Mostly, change up your speed, emphasize this phrase more, change the tone here, or your energy, etc. Just follow their direction as best you can.
This goes without saying but… Refrain from giving your opinion unless you are specifically asked. Receive all the direction you are given with grace. DO NOT have any ego. Be happy to give them 100 different takes in as many different ways as you need to. Always with a smile!
If there are any issues during your session, email your agent and don’t discuss them with the people in the session.
7. Duration
The duration of your session will depend on the length of your script, how many scripts you are recording, and the genre.
I’ve had a live-directed session take about an hour for a 90-second explainer video. A session for a single 30-second commercial script has taken an hour and a half. And I’ve had a session take 4-6 hours to complete.
From my experience, if you are doing a national commercial for a major brand, it will likely take a few hours to complete the session. That is because the end client needs to approve the voiceover. You will have round 1 – wait for notes. Round 2 – wait for notes. Etc. Etc.
Sometimes you have Source Connect open for hours while you wait for changes or approval. This is a great time to do some other tasks while you wait. Make sure you are ready to hop back to the mic as soon as they need you.
In Conclusion…
Well, that is all I have for you today. I hope this is helpful and puts your mind at ease for your upcoming live-directed session with source connect!
Katelyn
